
Still need help?

You can add custom workflows to your apps, which are basically a series of activities that take place in order to achieve a business outcome.
The first step is to create your app by adding fields in the Design App section. Once that is done you can configure it further in Configuration or go directly to Workflows for automating the app.
Here are the steps to build Workflows for automation.
Step 1
Select the trigger tab where you want your workflow to run: New Submission Flow, Edit Submission Flow, Review Submission Flow and Trigger Based Flow.

Step 2
Click on Start and select your desired Workflow node.

Step 3
Select a node and configure it on the right panel.

You can add several nodes in series or parallel based on your requirements.

Nodes in series are one after the other, whereas parallel steps have one node followed by multiple branches that run at the same time i.e. having the same parent step. Parallel flows allow you to perform multiple actions triggered by the same event — for example, in the above image, all 3 ‘IF’ nodes are triggered at the same time.
Step name refers to the name of the workflow. You can change the name accordingly.
Variable name refers to the unique name attributed to each node in the workflow. This is created automatically after you configure and save the workflow node and can be edited. It will appear before the step name.

Parent Step is the step that precedes this node (the step from which this node is triggered). This is used to move workflow nodes around.

By default, all the workflow nodes are turned on and the workflow steps will be executed.
If a node of the workflow is selected and the workflow step is turned off, this means the selected workflow node and the workflow steps below it will not be executed until it is turned back on.

Nodes cannot be dragged and dropped. To reposition a node, click on the node and on the right panel’s configuration, change its Parent Step.
Workflows can be copied from one submission flow to another (only user based-flows). Since there are three types of user-based flows: New Submission Flow, Edit Submission Flow, and Review Submission Flow; a workflow configured in any of these flows can be copied to another. Trigger Based Flows cannot be copied between flows and must be created and configured separately.
To copy a workflow:
Go to the submission flow that contains the workflow you want to copy.

Click on the Copy Workflow icon.

A right panel will appear. Under Select Workflow Type, choose where you want to copy the workflow.

Under Select Parent Node to Copy Workflow Under, select the parent node.


Click ‘Copy Workflow’ to confirm.

All workflow steps will be copied and will fall under the parent workflow node that was selected. Currently, you cannot choose to copy only specific nodes or steps.
Once the workflow nodes have been added and configured, it can be trial tested to check if it works according to the app submissions.
This is used in case you do not want to disturb any existing submission data that you may have in your app already.
Once workflows are added, a lightning symbol will appear next to the trigger tab. Click on it to run trials.
Note: Trigger Based Flow does not have this option.

On the right panel, app fields that have been configured in Design App will appear here. Fill in the fields just like a live app and click on ‘Run Trial Workflow’.

Workflow nodes can be deleted individually or along with all their subsequent workflow nodes.
To delete a workflow node:

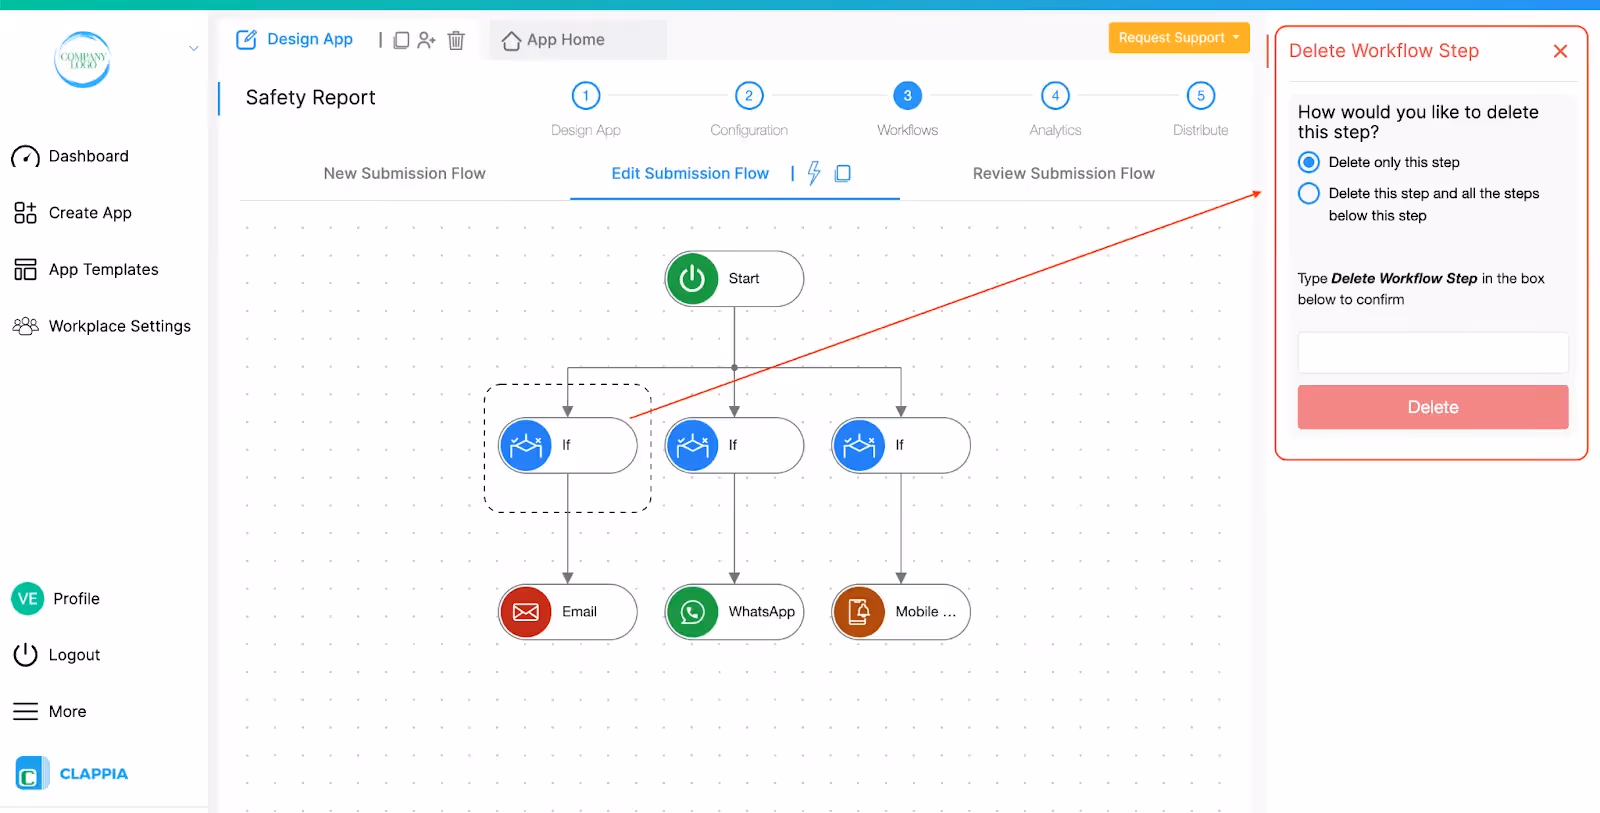


To confirm deletion, type Delete Workflow Step in the box provided and click on ‘Delete’. Once deleted, workflow nodes cannot be recovered.
Note: When deleting trigger based nodes (schedule and trigger email), all workflows underneath those nodes will be deleted.
1. You can configure each node with custom contents from the values entered in your app in the form of variables.
Example: Mobile Notification Node
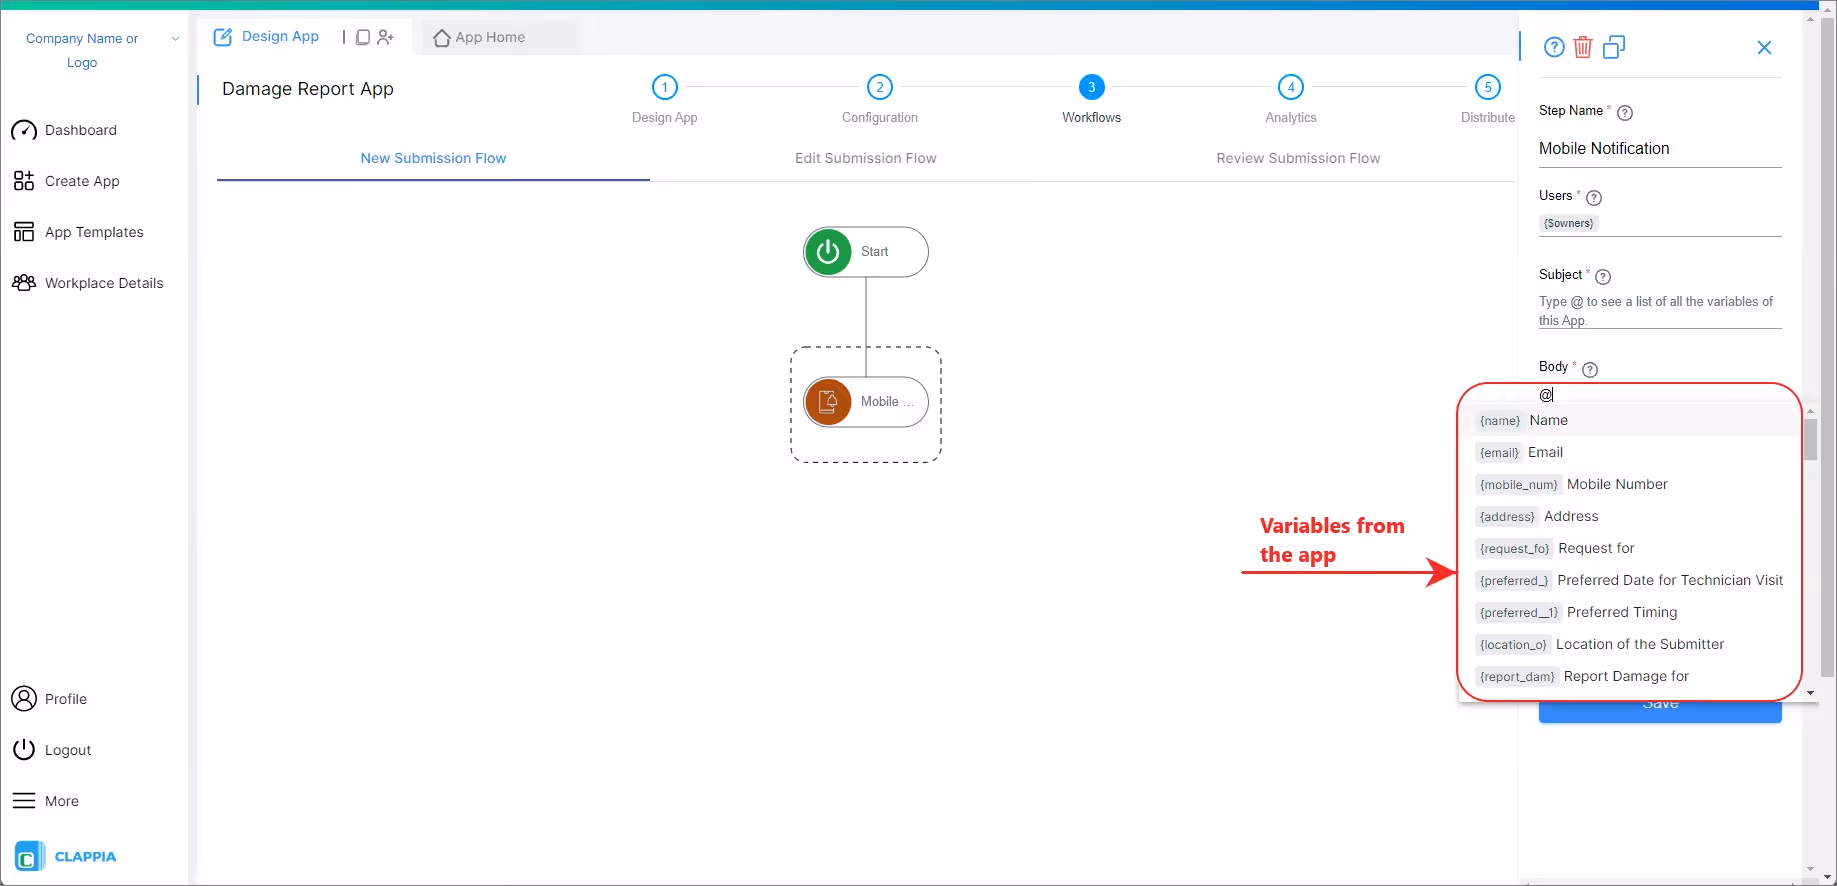
2. Each and every node has different configurations. Check the Help Guides below to know how to use them.
Workflows in Clappia run on individual submissions, such as when a user submits or manually edits a record. However, when using Bulk Upload or Bulk Edit from the Submissions tab, workflows are not triggered, even though new submissions may be added or existing ones updated.
This is because workflows are designed to process one submission at a time. Triggering them for bulk operations can lead to incomplete or inconsistent results, especially for complex workflows.
If you need workflows to run after a bulk operation, currently you will need to open each submission manually and save it. This will count as an edit and trigger the workflow normally.
Next Step: Add users to your App
L374, 1st Floor, 5th Main Rd, Sector 6, HSR Layout, Bengaluru, Karnataka 560102, India
3500 S DuPont Hwy, Dover,
Kent 19901, Delaware, USA


3500 S DuPont Hwy, Dover,
Kent 19901, Delaware, USA
L374, 1st Floor, 5th Main Rd, Sector 6, HSR Layout, Bengaluru, Karnataka 560102, India
.svg)
