

Still need help?

Clappia bypasses traditional app installation and App Store/Play Store distribution by using app assignment. Simply assign your app to a set of users and they can access all apps assigned to them by logging into a common Clappia app or Clappia website. Here is a quick guide -
It's important to add users to your Workplace first. This is important in the long run to maintain your data security. A user can be removed from a Workplace, and they will lose access to all apps.
Users can be added by navigating to Workplace Settings tab on the left panel of the dashboard.

Add the email ID of the users who need to be a part of one or more apps in your Workplace. This is a one time action for each user. In case the user is not a Clappia user already, he/she will receive an email with the sign up instructions and link.

You can also change the country code of the user.


Add multiple users through the invite users in bulk option.


You can also invite users in bulk using only their phone numbers.

To assign roles to users (Workplace Manager, Builder, or User), navigate to Workplace Settings > User Management.
You can assign or change roles for users in two ways:


Note
Go back to your app by navigating to the Dashboard icon on the left navigation. You should see your app again. Click on the app icon to open the app and then go to the Design App tab.
Go to the Distribute tab. Click on the User Access button.
Select one or more of your Workplace users on the right panel under Users. The list will include the users that you invited to your Workplace.
Select App Permissions for the selected users and click 'Assign'.
Note: App Admin permissions can only be assigned to users with a Workplace Manager or Builder role in the Workplace. Users with a regular User role cannot be made App Admins.


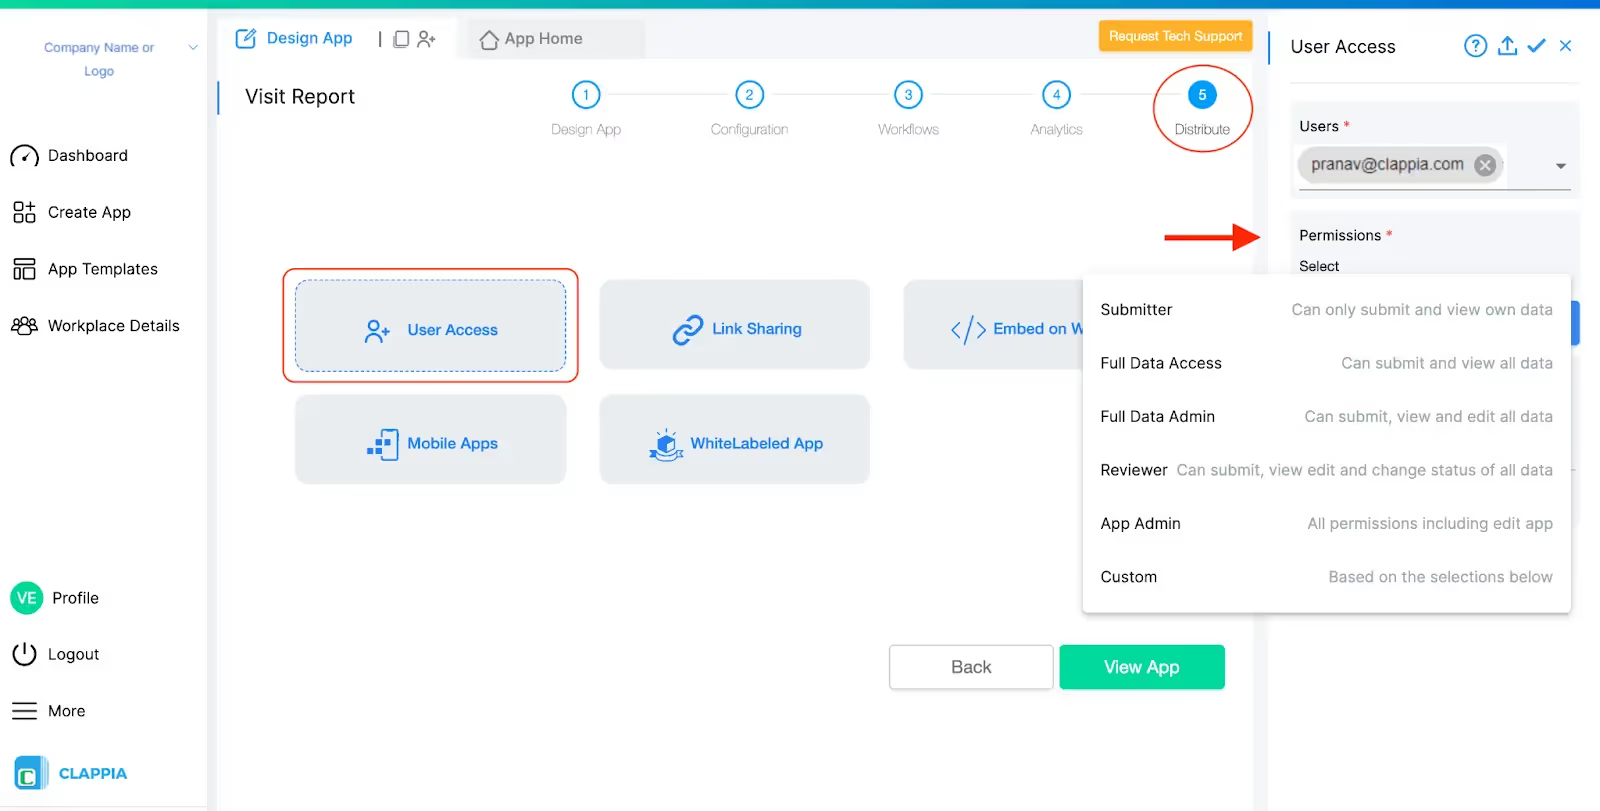
The users will receive an email with the app link. Whenever the users sign up, they should see this app in the dashboard of <yourcompany>.clappia.com. The users can access the mobile app by downloading the common Clappia app and logging in with the same email ID.
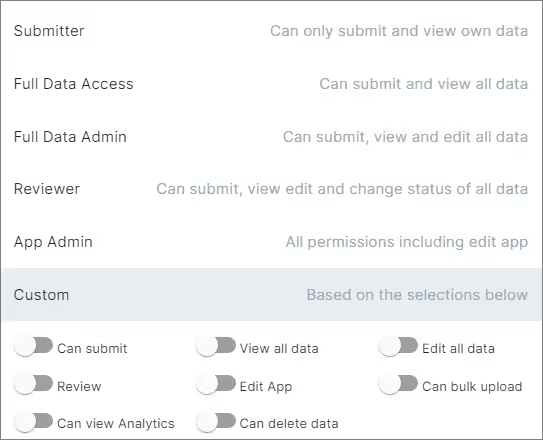
Submitter - Can only submit and view own data
This permission allows the user to use the app to submit data and view/edit their own submissions only.
Full Data Access - Can submit and view all data
This permission allows the user to use the app to submit the data and view all the submissions in the app.
Full Data Admin - Can submit, view and edit all data
This permission allows the user to use the app to submit data, view all submissions and also edit all the submissions in the app. The user with this permission is called the Data Admin.
Reviewer - Can submit, view, edit and change status of all data
This permission allows the user to use the app to submit data, view and edit data, and change the status of all of the submissions.
App Admin - All permissions including edit app
This permission allows the user to submit data, view submissions, edit submissions, change the status of submissions. The user will have complete authority over the data of the app and is called an App Admin or Admin. They are also able to make changes to the app design.
Note: App Admin permissions are restricted to users with the Builder or Workplace Manager roles in the Workplace.
Custom - Based on the selection of specific permissions
Specific permissions can be granted to specific users according to the requirements. The list includes:
You can enable multiple options to give users the right type of app permissions.
In case the Workplace has a lot of users, you can add users to your apps by uploading an Excel file. The Excel file will contain the email ID of the users along with their permissions in the apps.
You will find the option to upload the Excel file in the Configuration tab itself.


You will get a blank Excel file with only the header. Download the file and add the user email addresses and their permissions in the Excel file and upload the file.

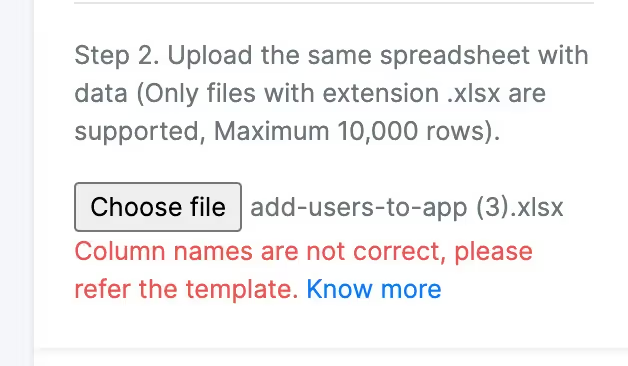
In case you modified the header accidentally, it will be rejected and you will get a message like the following -
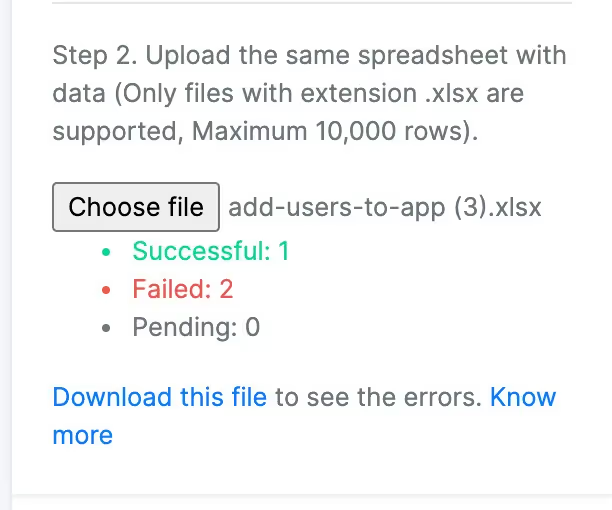
As the upload progresses, you will get the statistics showing how many records succeeded and how many failed. You will also get a list of the failed records in another Excel file.
The failed records file will look like the following -

Possible Errors:
To allow a user to create apps, assign them the Builder role in Workplace Settings. Assigning the Builder role enables app creation while maintaining control over who can build or modify apps within the Workplace.
Users who have been given access to your apps will not be able to create or modify apps in the Workplace if they have the role as “User” designated to them in Workplace Settings. Only those with a Builder or Workplace Manager role can create apps.
L374, 1st Floor, 5th Main Rd, Sector 6, HSR Layout, Bengaluru, Karnataka 560102, India
3500 S DuPont Hwy, Dover,
Kent 19901, Delaware, USA


.svg)




3500 S DuPont Hwy, Dover,
Kent 19901, Delaware, USA
L374, 1st Floor, 5th Main Rd, Sector 6, HSR Layout, Bengaluru, Karnataka 560102, India