
Still need help?

This article explains the 'Calculation & Logic' block (also known as the Formula block) that can be used as part of App design.

Clappia supports multiple arithmetic operations (SUM, DIFF, PRODUCT, LOG...), logical operations (IF/ELSE, AND, OR, XOR, ...), string operations (CONCATENATE, LEN, TRIM, ...) and DATE/TIME operations (TODAY, NOW, DATEDIF, FORMAT) that are supported by Microsoft Excel.
To use this block, you don't need to learn any new language or syntax. Basic know-how of Excel is sufficient to use the Formula block in a Clappia app.
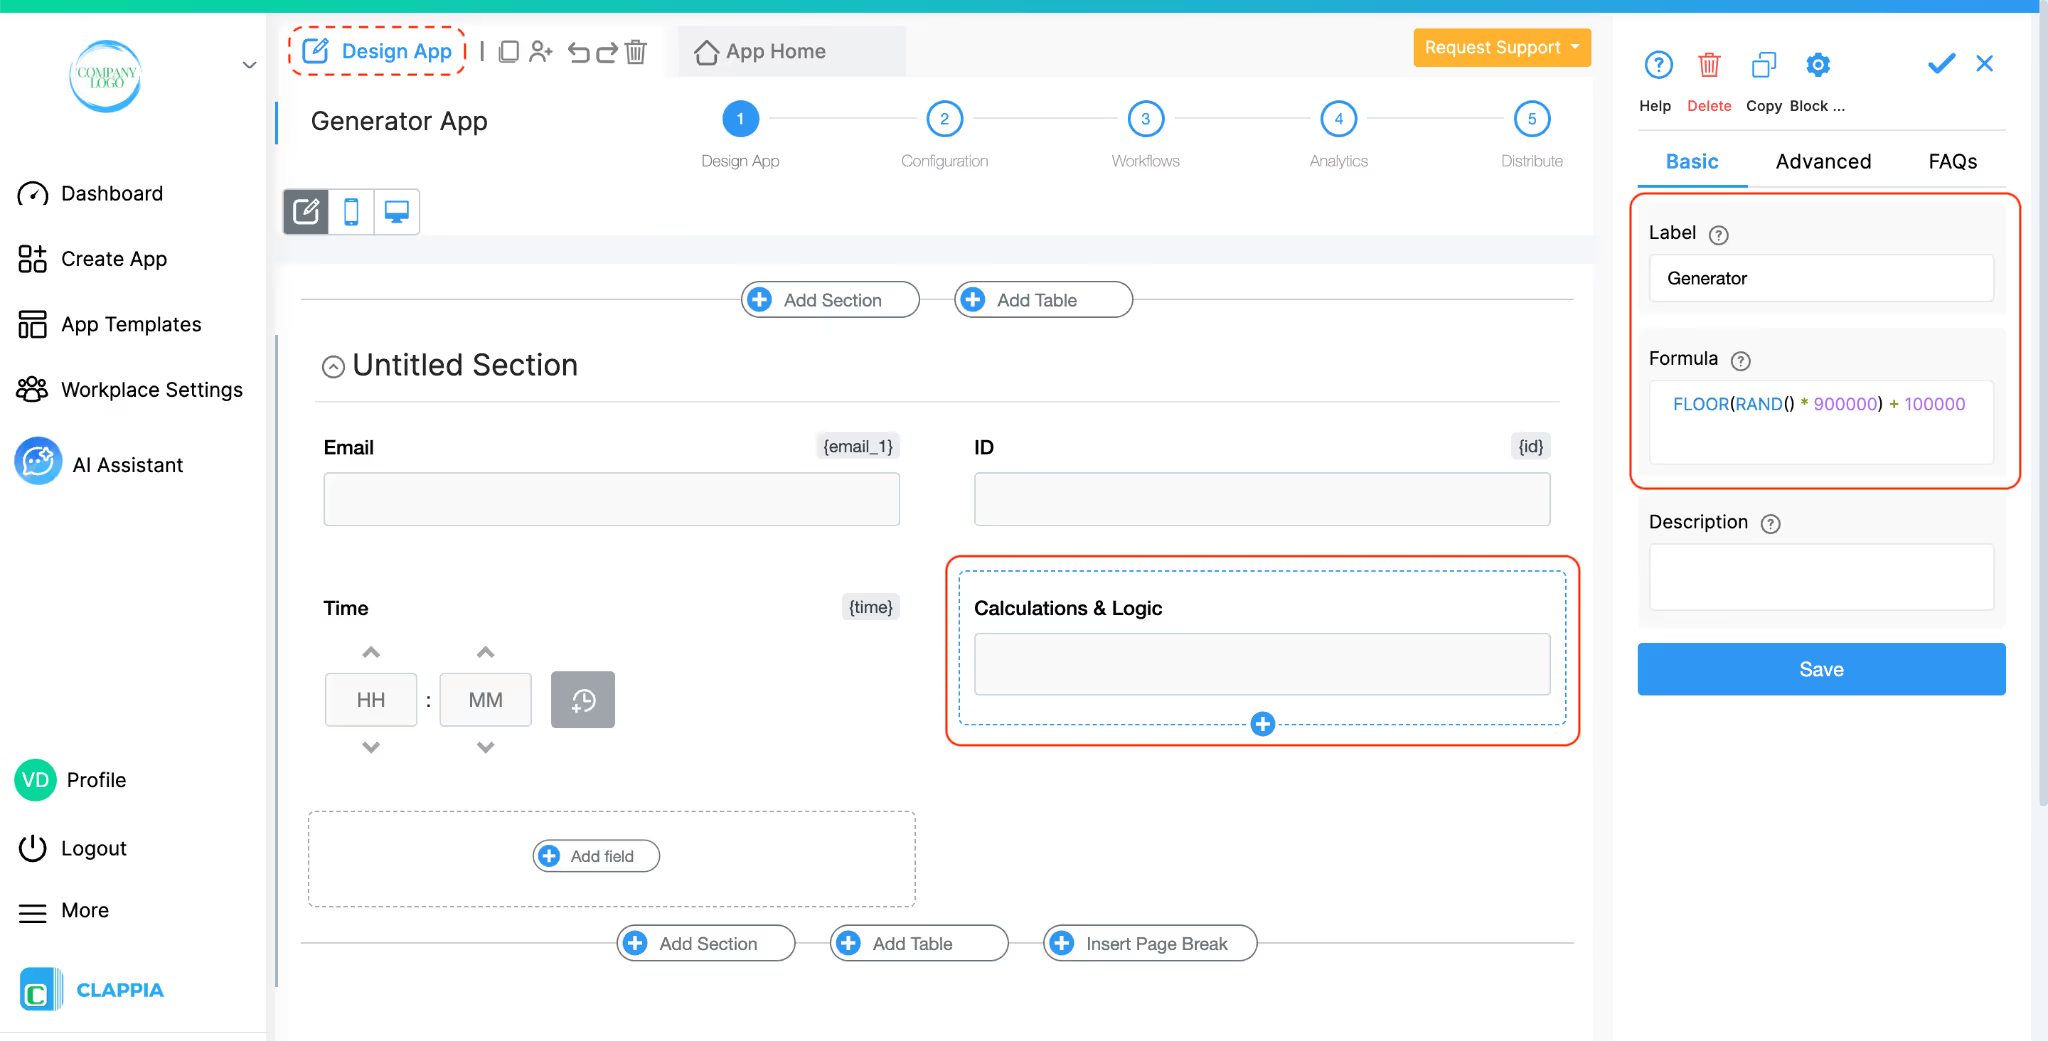
Click on the block and start editing on the panel that appears on the right side.


This is what appears as the name of the input block to the end-user.
This is where the calculation logic needs to be defined. The formula can refer to other fields already defined in the app by using their variable names. Just type '@' and you will see a list of all variables that can be used in the formula.
This is the text that goes below the input block to help the user.

The Advanced Label option allows you to change the label of a field dynamically based on a condition you define. Instead of always showing the same fixed label under the ‘Basic’ tab, the field can display different labels depending on requirements of the form. Use spreadsheet-like functions such as IF, AND, OR, etc. and make use of other field variables to set your conditions. Type @ and select the field.
This is useful when the meaning of a field changes based on context, business logic, or user choices.
For example:
If you have a dropdown called Type with options “Total Amount” and “Discount Amount”.
You want the calculated field’s label to reflect the type of calculation.
So:
– If Total Amount, show “Total Amount Calculated”
– If Discount Amount, show “Discount Calculated”
Formula:
IF({type} = "Total Amount", "Total Amount Calculated", "Discount Calculated")
This allows the same field to adapt its displayed purpose without needing multiple separate fields.
The Advanced Description option works exactly like Advanced Label, but it changes the description text instead. This is useful when guidance or instructions for a field need to change depending on earlier answers.
For example, using the same scenario from Advanced Label:
If you have a dropdown called Type with options like “Total Amount” and “Discount Amount”, you may want the description of your Calculation field to guide the user differently depending on what they selected.
So:
– If the user selects Total Amount, the description could say: “This shows the total amount calculated for the submission.”
– If the user selects Discount Amount, the description could say: “This shows the discount calculated based on rules.”
Formula:
IF({type} = "Total Amount", "This shows the total amount calculated for the submission.", "This shows the discount calculated based on rules.")
This helps users understand what is required from them without showing unnecessarily long or irrelevant instructions.
Additional Examples (Apply to Both Advanced Label and Advanced Description)
1. Showing nothing until a selection is made
For example, if you have a dropdown field called Visit Category with options “Routine” and “Urgent”, you may want the label or description of a field to remain blank until the user first selects a category.
Once a selection is made:
Formula (can be used in either Advanced Label or Advanced Description):
{visit_category}The label/description stays empty until the dropdown has a selected value.
After the user picks an option, the selected text (Routine or Urgent) becomes the label or description.
2. Changing label/description based on language selection
For example, if your form includes a dropdown field called Select Language with options English, Spanish, and French, you can show the label or description in the selected language.
So:
Formula (can be used in either Advanced Label or Advanced Description):
IF({select_language} = "English", "Enter details", IF({select_language} = "Spanish", "Ingrese detalles", "Entrez les détails"))The formula returns the text for the selected language.
Only one label/description is shown at a time, depending on what the user picks in the Select Language dropdown.
1. Variables do not change
When a field is created, its variable name is derived from the label you set in the Basic tab. That variable name is what you must use in formulas, workflows, and other logic. The visible label or description shown by Advanced Label / Advanced Description does not change the variable name.
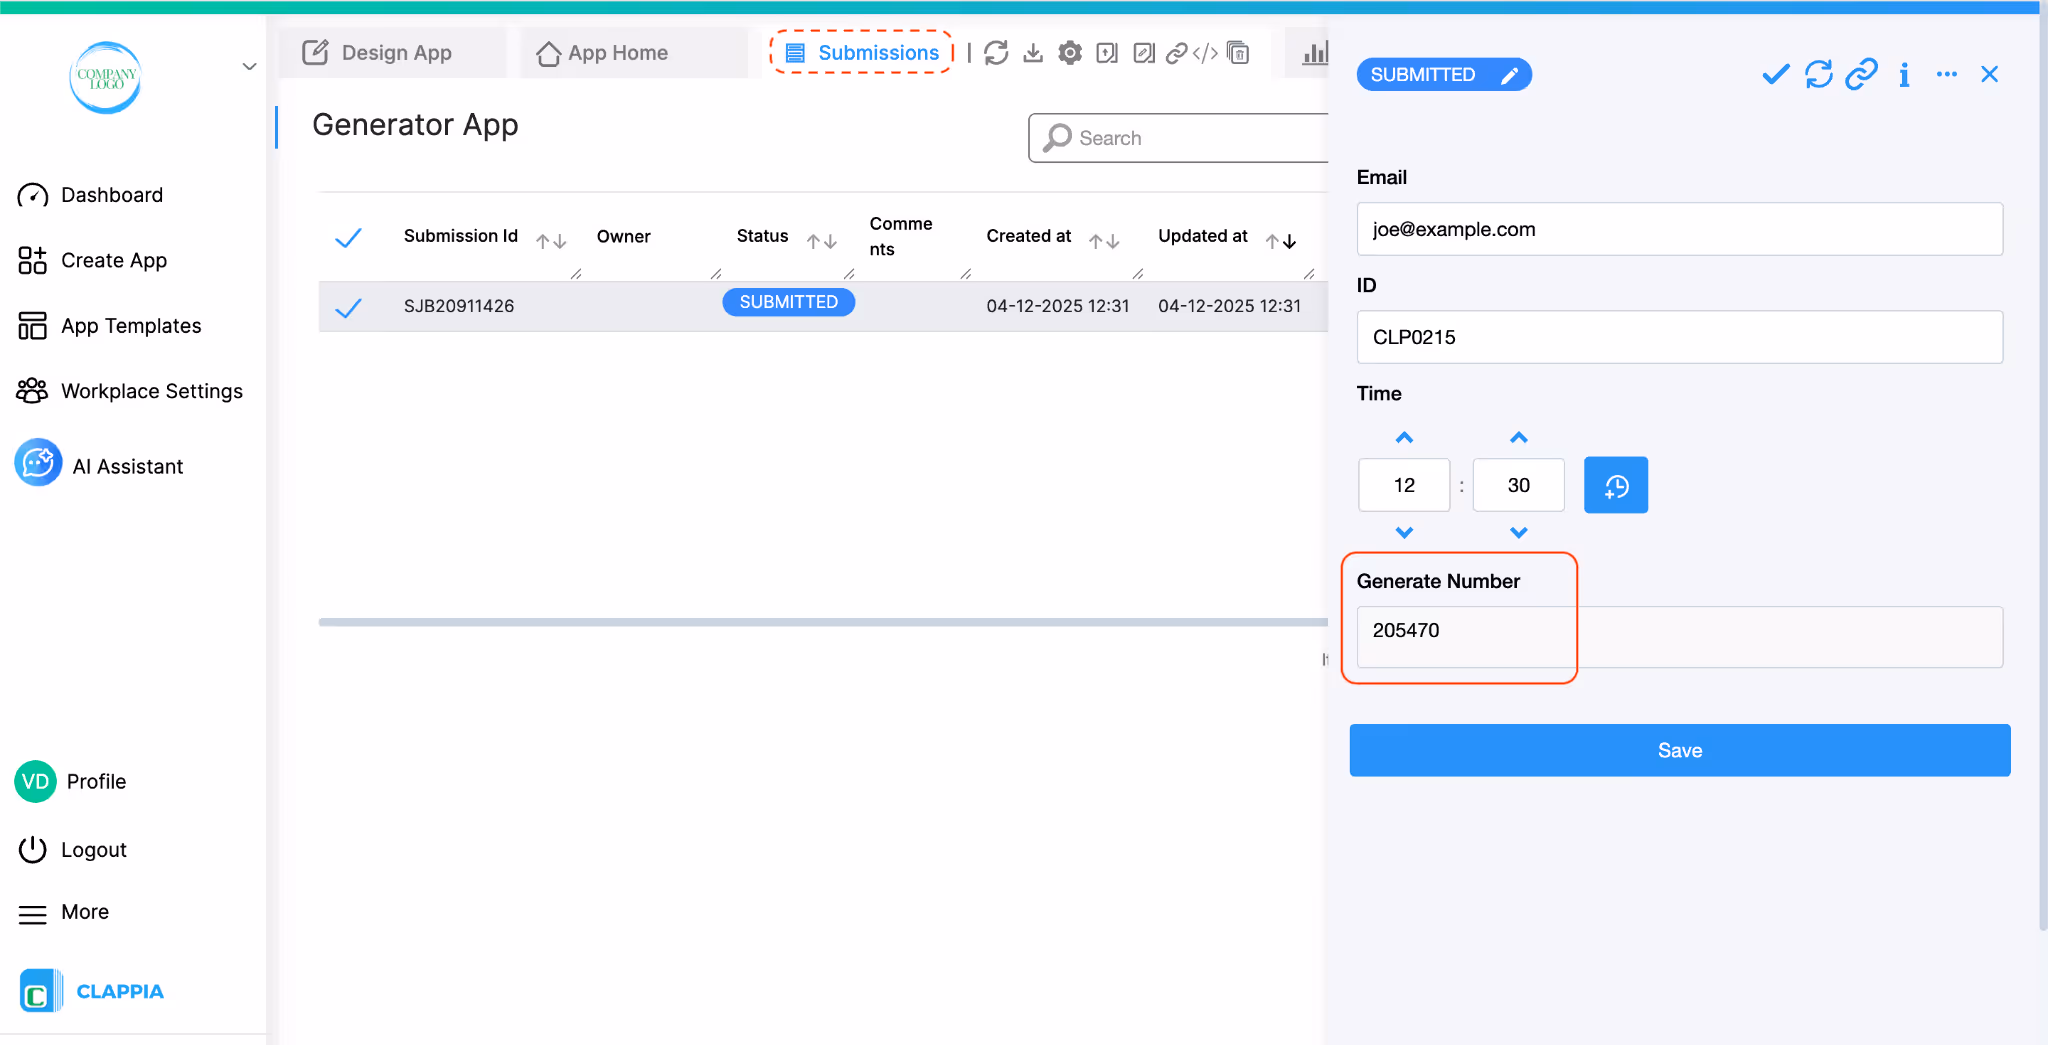
2. Submissions tab: table view vs right panel
In the Submissions area, the table view always displays the labels from the Basic tab. When you open an individual submission, the right panel shows the labels and descriptions as they appear in the form (i.e., the Advanced Label and Advanced Description applied for that submission). This keeps the submission list consistent while letting reviewers see the context-aware labels and descriptions when viewing a record.
3. Bulk Edit shows Basic tab labels and descriptions
When you need to Bulk Edit submissions, the spreadsheet you download shows the labels and descriptions from the Basic tab only. Advanced Label and Advanced Description are not applied in Bulk Edit, so keep that in mind when preparing bulk updates.
4. Some fields cannot be used inside Advanced Label/Description formulas
Certain block types do not expose a variable that can be referenced in Advanced Label or Advanced Description. If a block does not expose a variable, you cannot use it inside the formula.
Geo Address
GPS Location
PaymentGateway
Audio
Live Tracking
Signature
Code Scanner
NFC Reader
Get Data from RestApi
Get Data from Other Apps
Get Data from Google Sheets
Get Data from Database
AI Block
Text, HTML & Embedding
Attached Files
Image Viewer
Video Viewer
PDF Viewer
Code block
Progress Bar
Action Button
Tick this option if you don't want to show the calculation output to the end user. The variable name of this formula field will still be available for use in other formulas. This field can serve as an intermediate variable in your complex calculation.

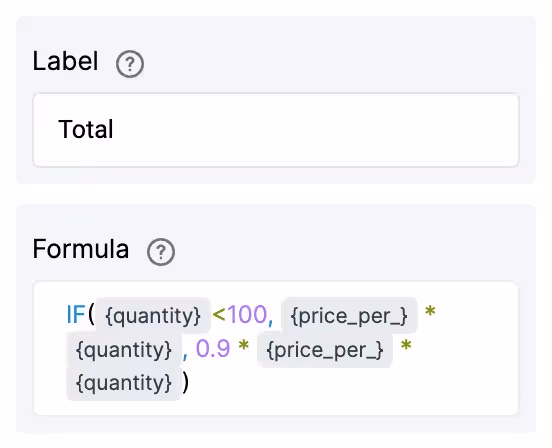
This example shows how the Total price can be calculated based on the quantity of an item purchased and the price of an individual item. Additionally, if the quantity is greater than 100, we want to give a discount of 10% on the total price.
Create two input variables - Price and Quantity, using the single-line Text block.

Create a Formula block with the following formula (You don't need to type the variable names for price and quantity. Just type '@' to see a list of all available variables)
IF ({quantity}<100, {price_per_} * {quantity}, 0.9 * {price_per_} * {quantity})
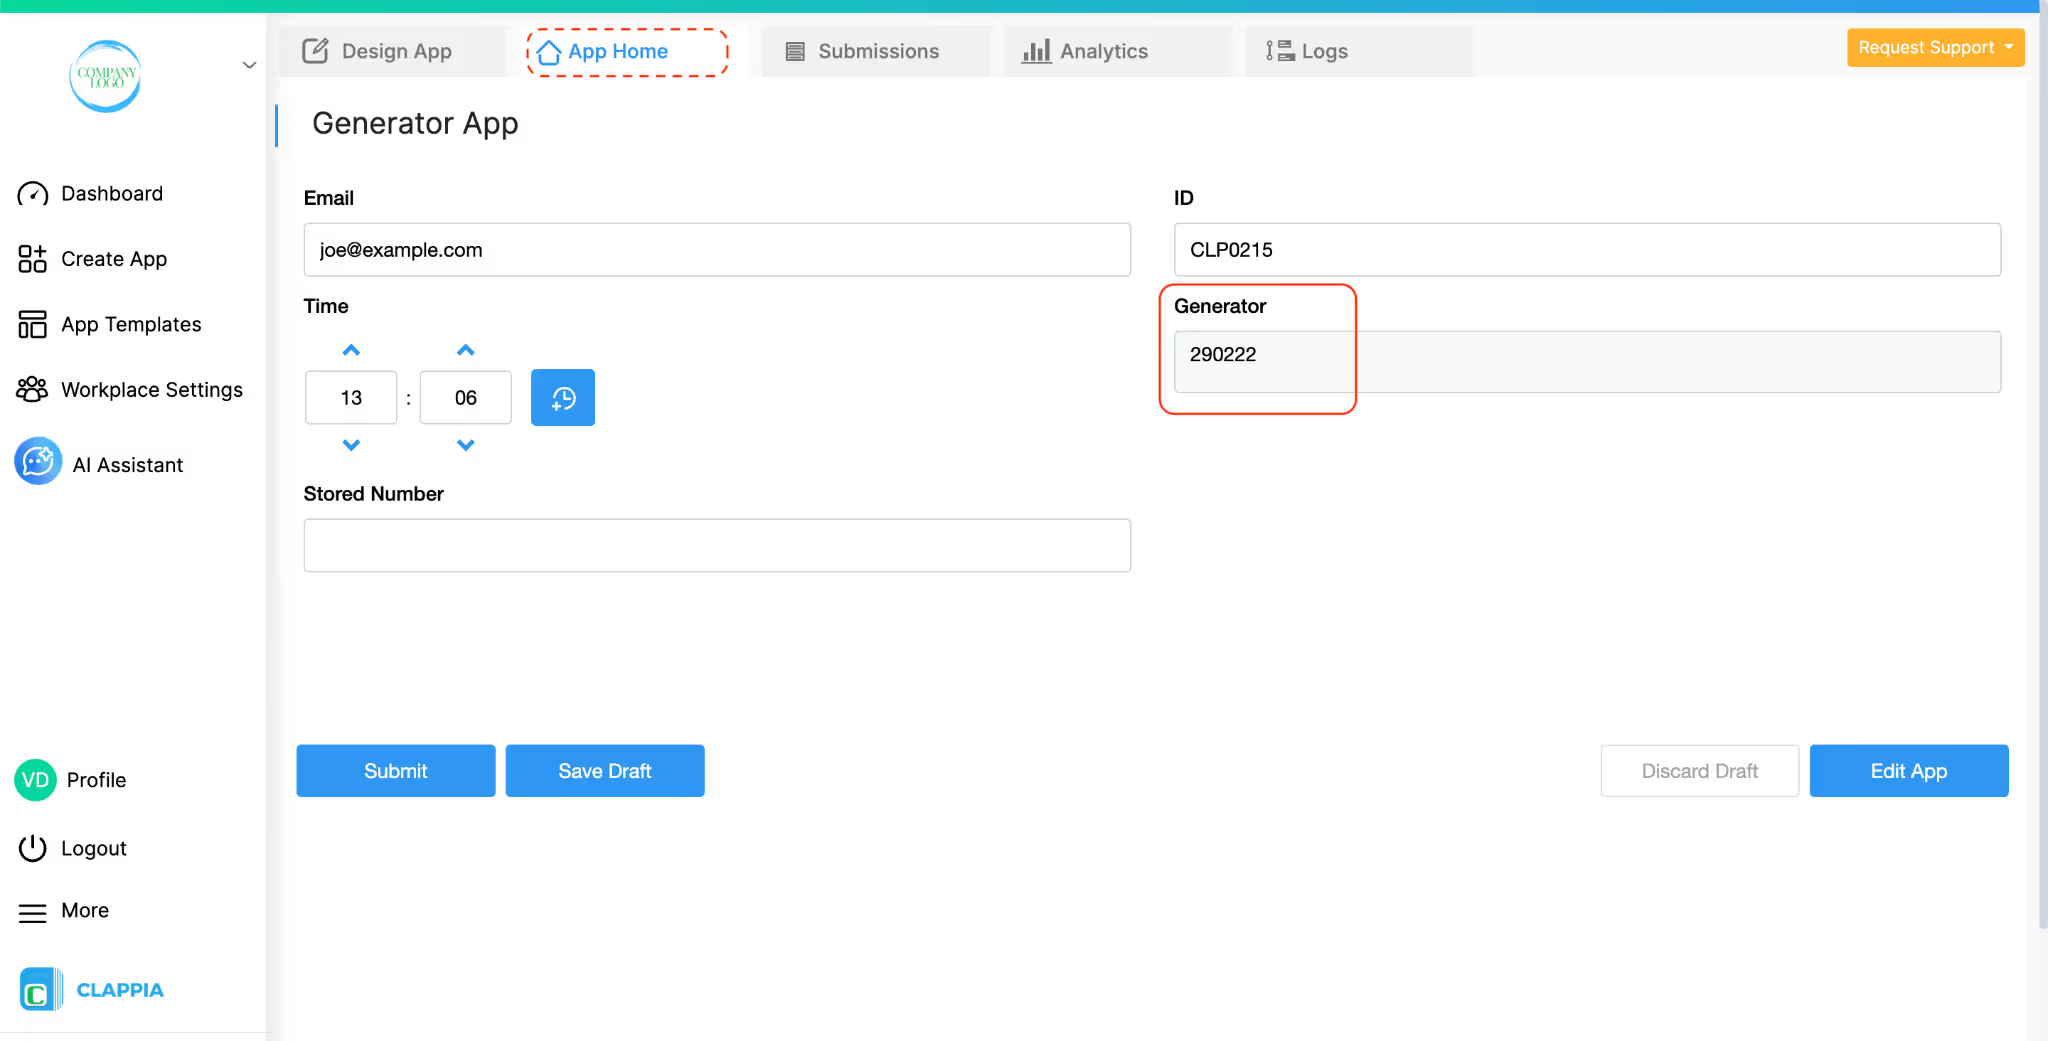
App Home
Click on App Home to open the app and verify if the formula is correct.
Input the amount in the price and quantity fields. The total is calculated automatically.


If your formula produces a fixed calculation, the value will show the same value throughout. However, when your formula uses dynamic values (for example, generating a random number), the below behaviour becomes important to understand.
The Formula Block is recalculated every time the form is opened or reloaded. This means that the value submitted initially is not stored as a fixed/static value inside the formula field. Instead, the formula runs again whenever:
Even if the result happens to be the same, the calculation is still being re-evaluated in the background.
This behaviour is important to understand when using formulas that depend on dynamic values.
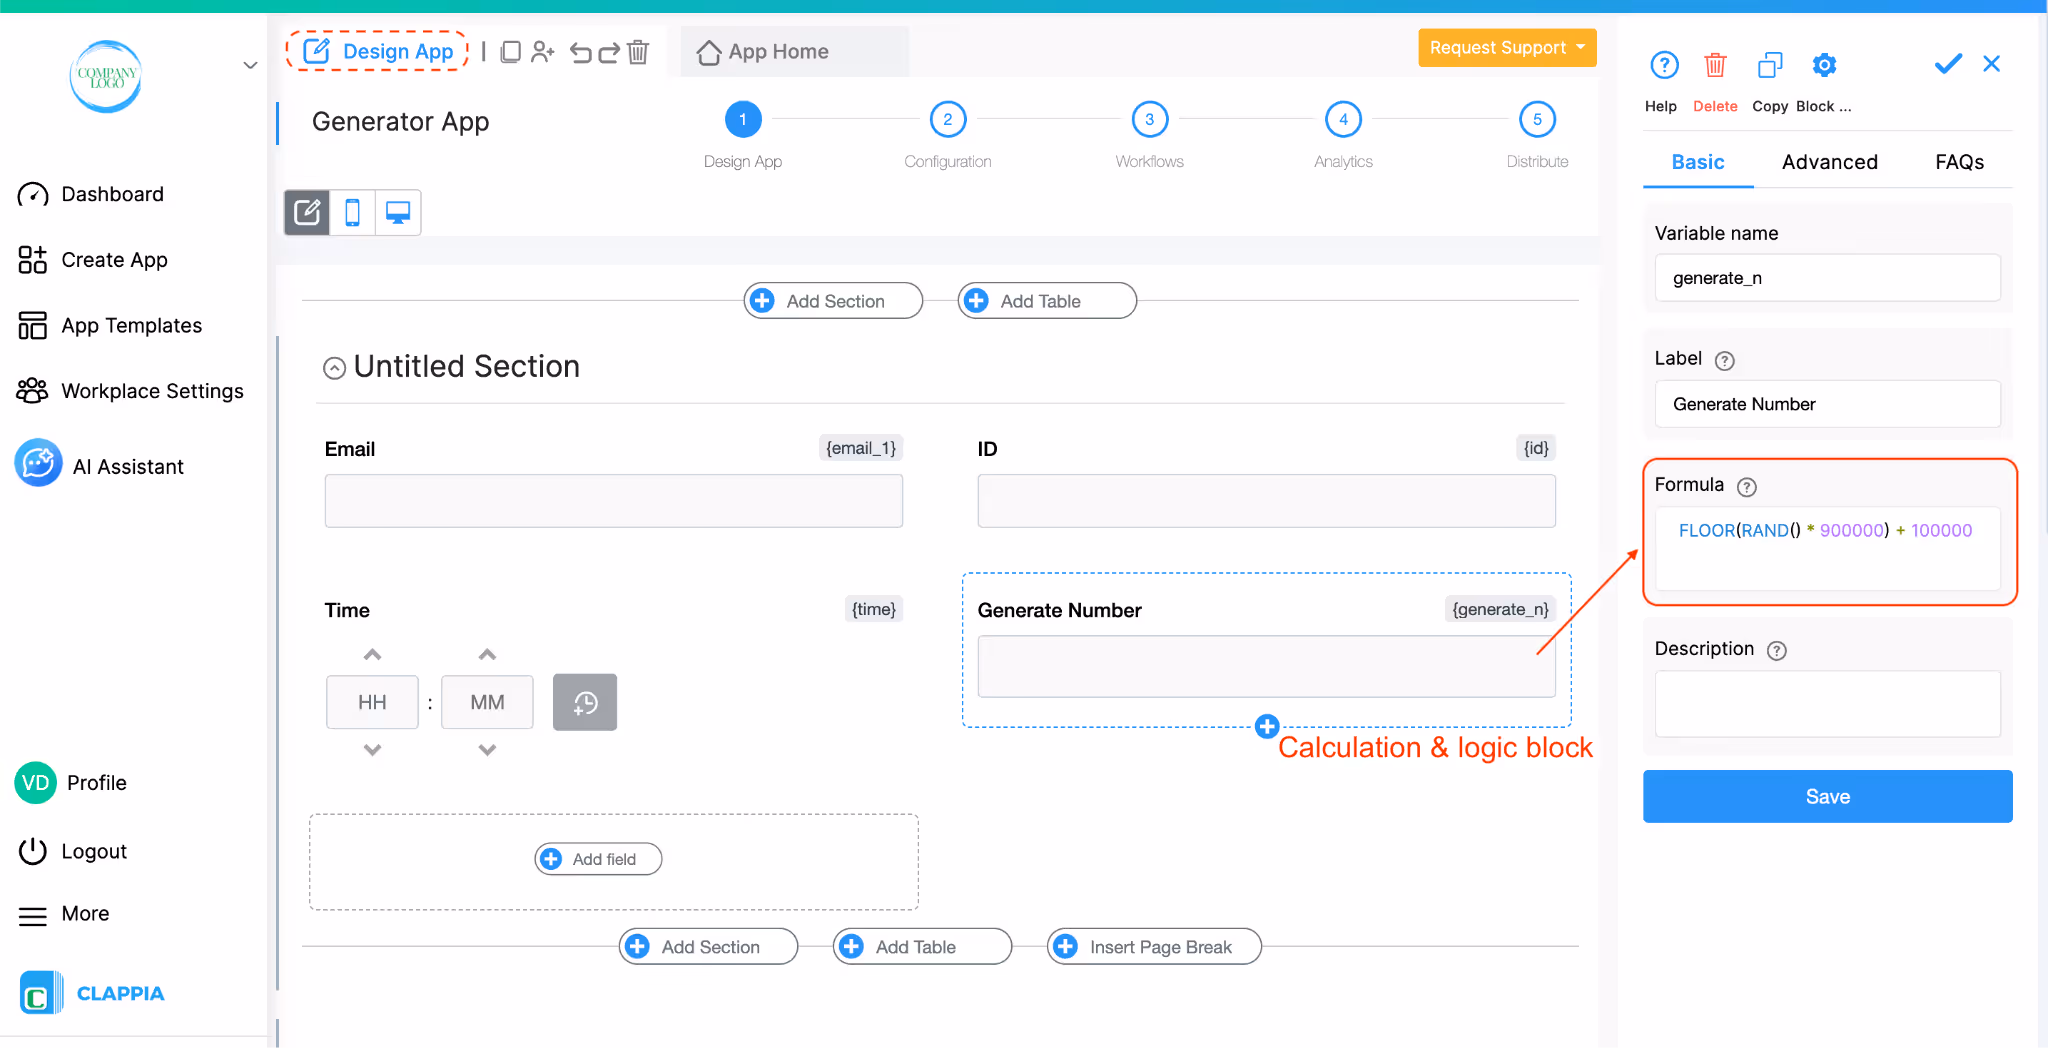
Example – Random Number (OTP-style) Formula
Consider a formula using a random function (for example, using RAND() to generate a random number) that you use as an OTP-style value or a one-time random code:

This is expected behaviour because the Formula Block always recalculates; it does not store the earlier value by itself.
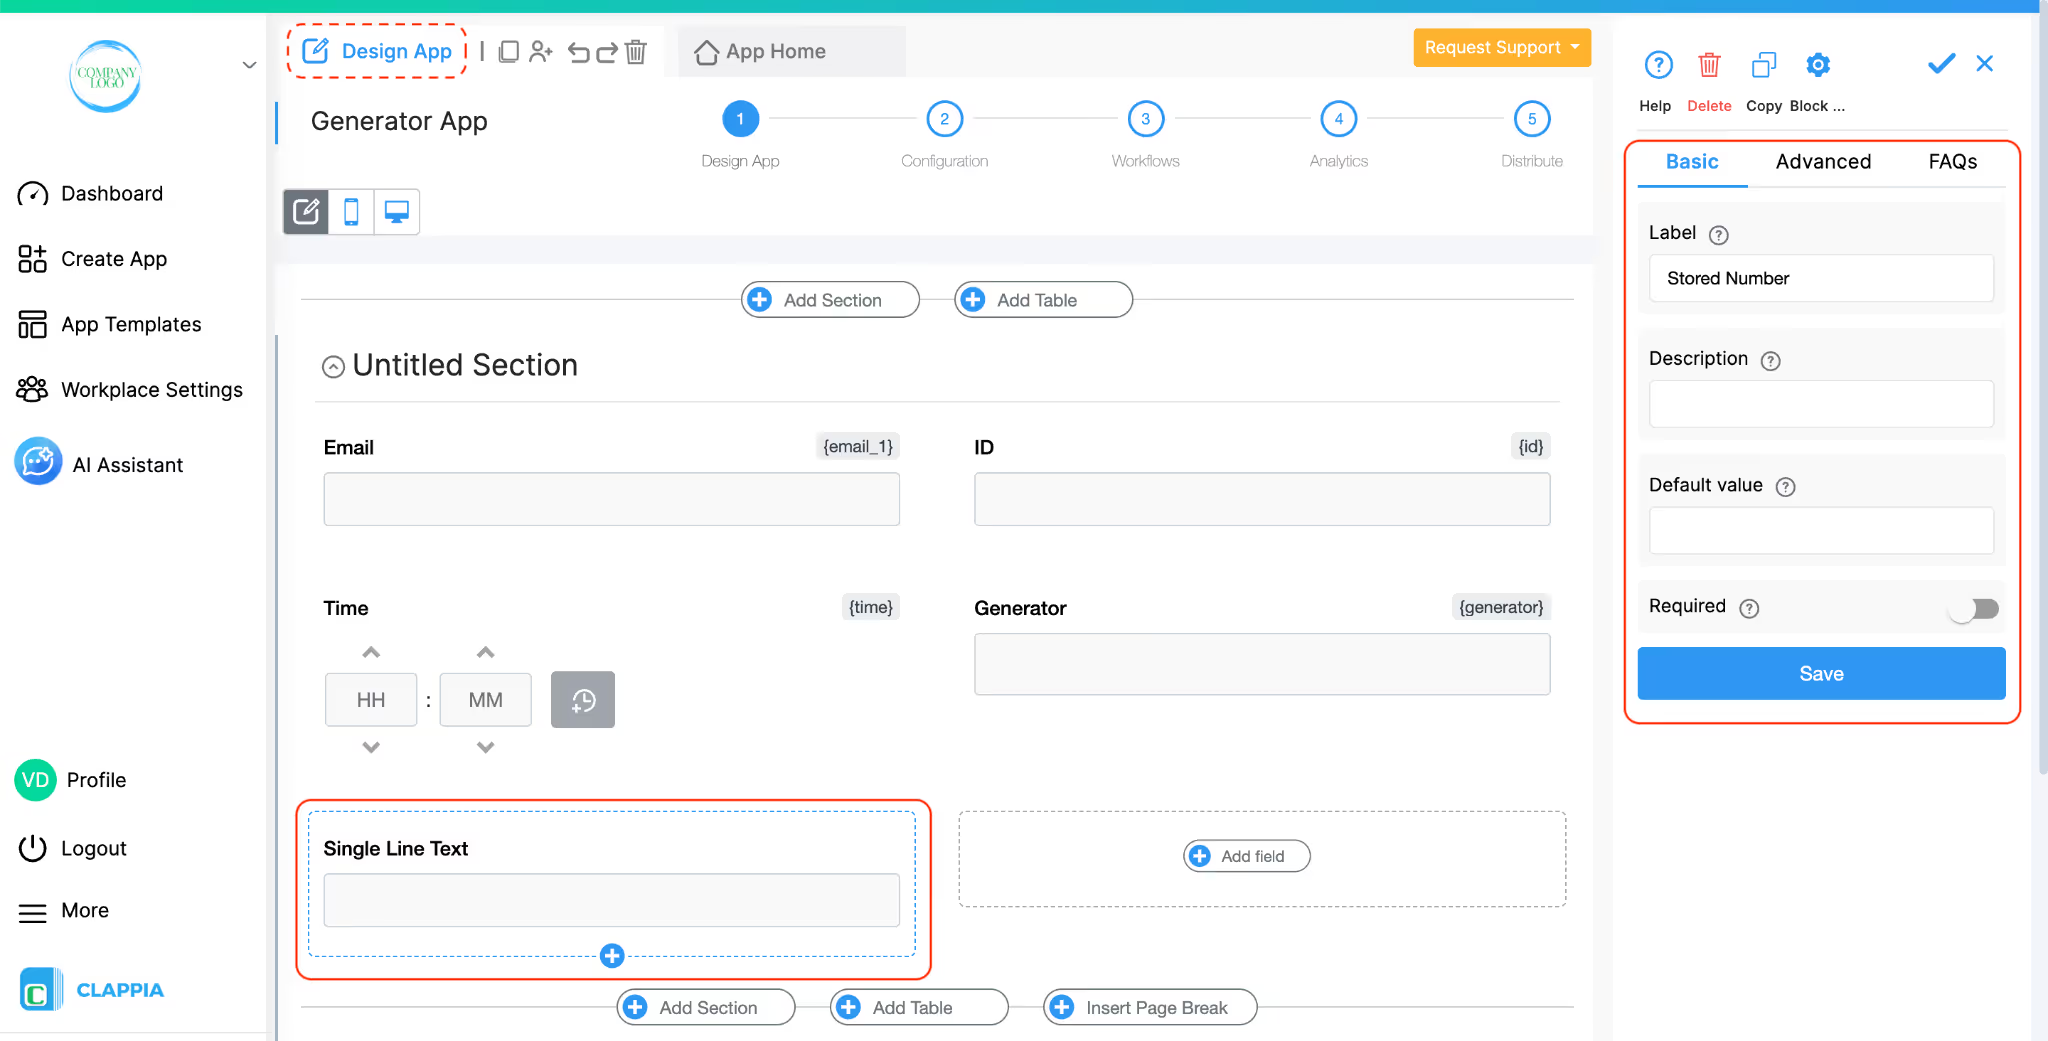
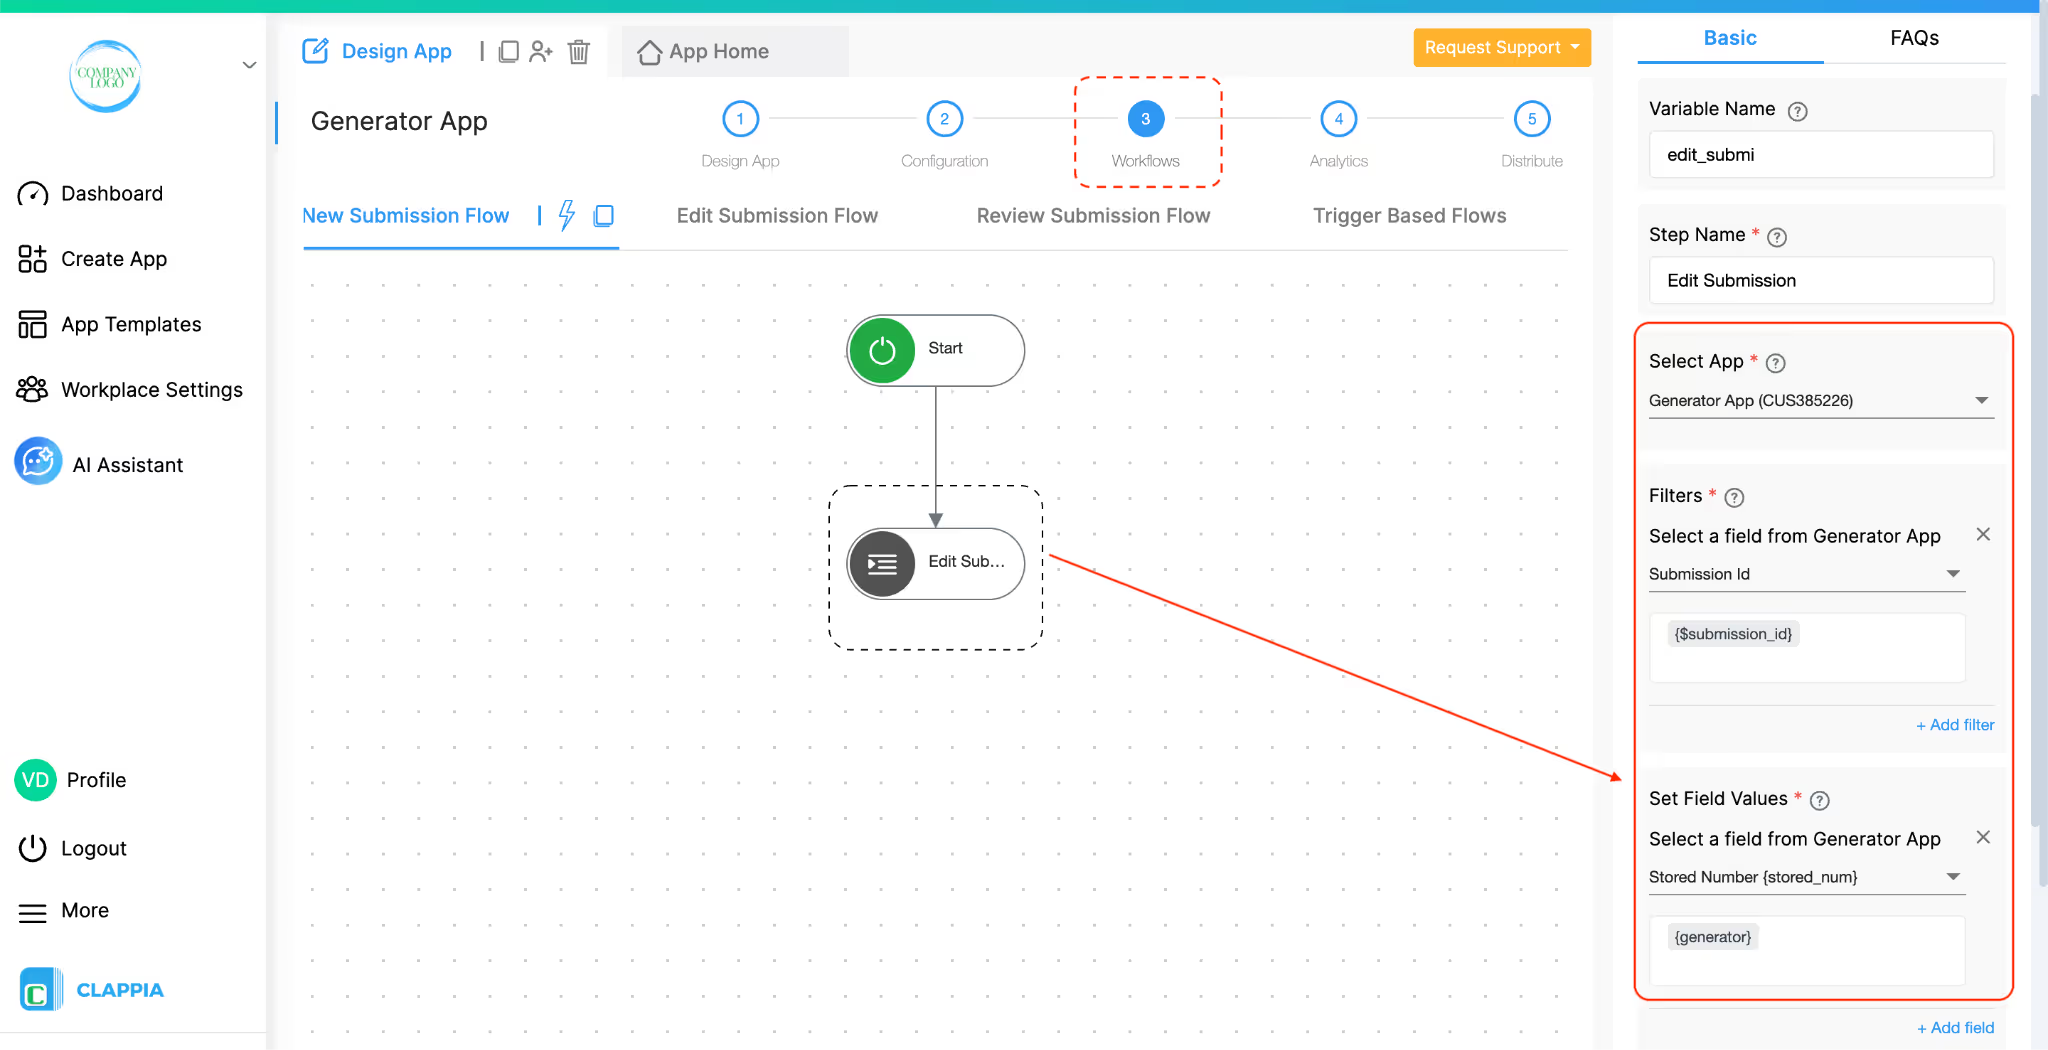
If you want to keep the original formula result unchanged, you can copy the value from the Formula Block into a normal field using an Edit Submission workflow. The normal field will then store the value as it was at the time of submission, and will not change on reload.
Below is one example using a random number:
Now, when a new submission is made:
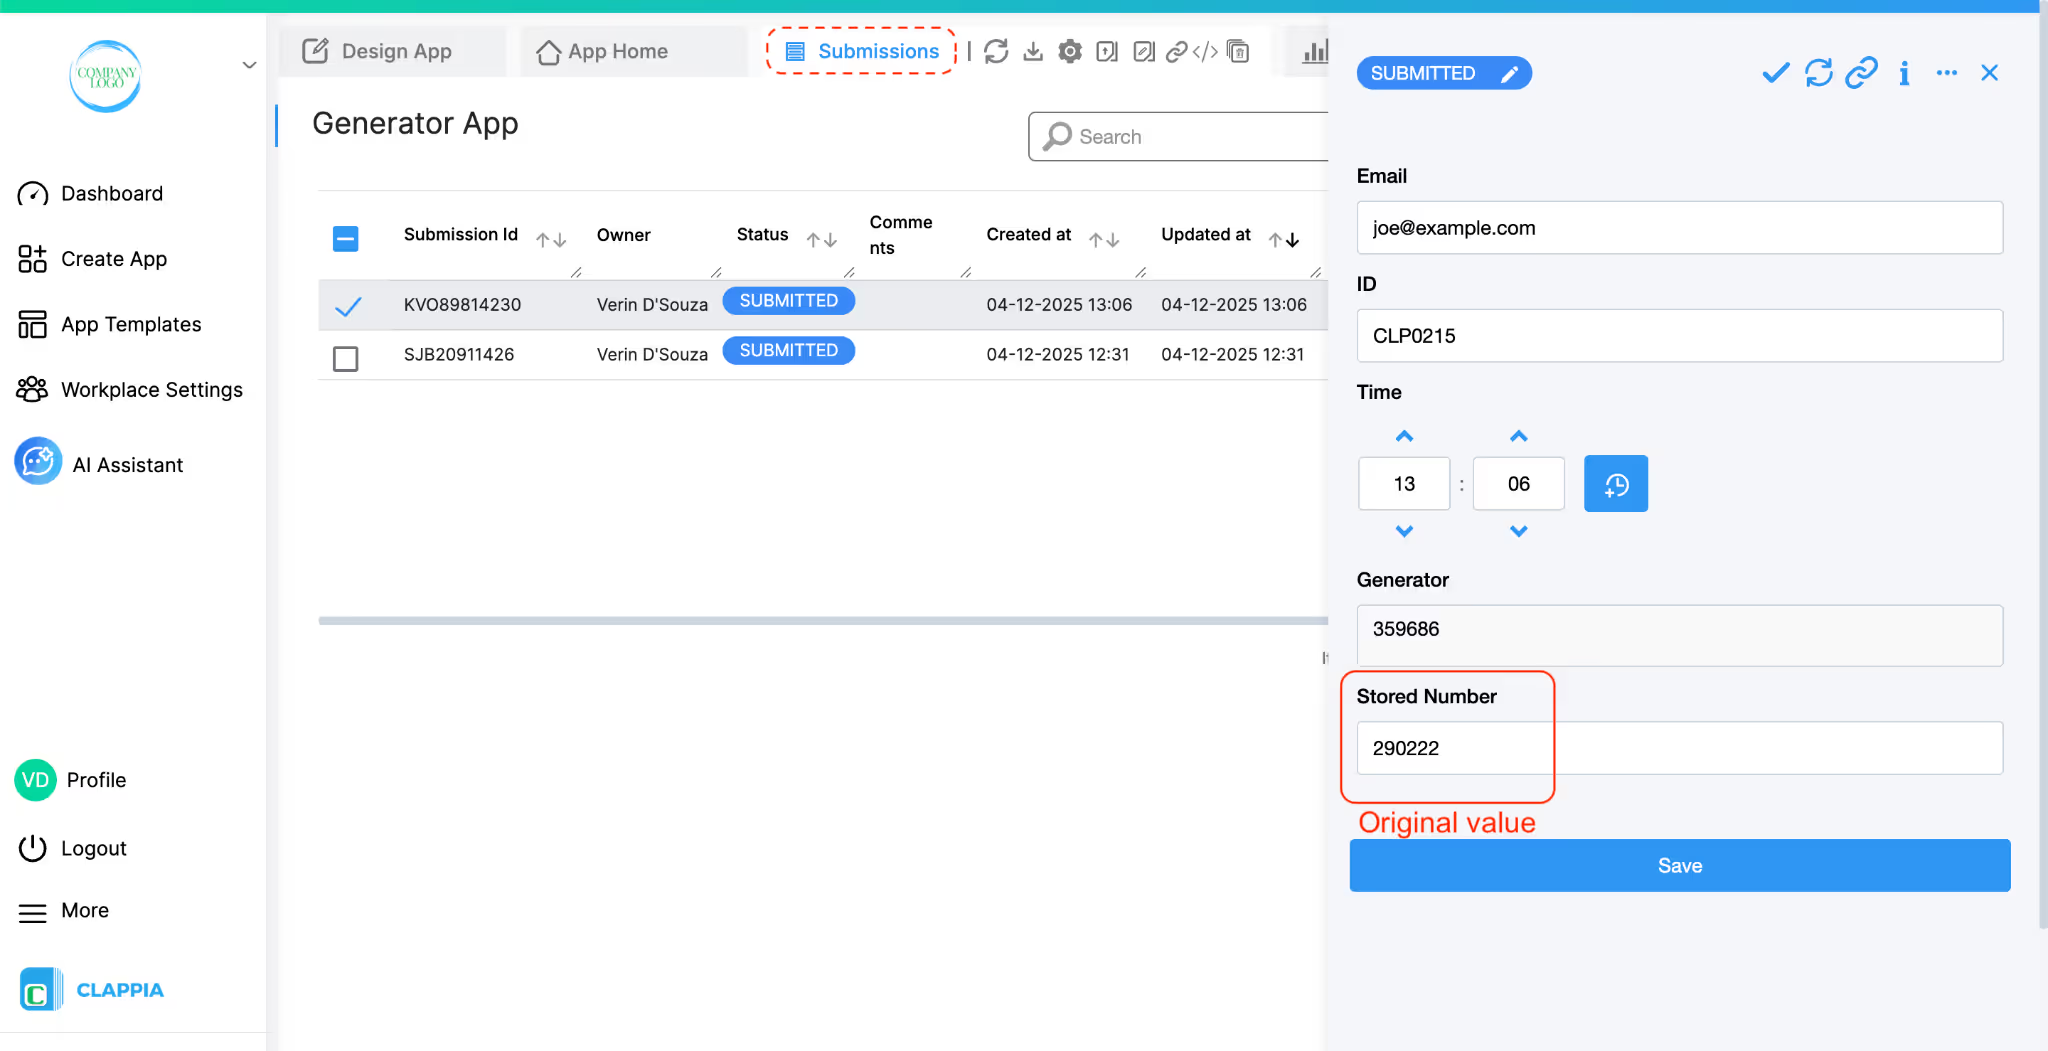
You can use the same pattern for other use cases where you want to “freeze” a calculated value (for example, pricing, scores, or time-based calculations).
The Calculations & Logic (Formula) block itself cannot be edited using an Edit Submission workflow, because its value is always driven by the formula defined in the block.
However, the calculated value from the Formula block can be used to update other editable fields using the Edit Submission node as seen in the above example.
You can use the value generated in a Formula block and copy that value into a Single Line Text, Number, or any other editable field using an Edit Submission workflow node.
This is commonly used when you want to store a fixed value that was originally calculated by a formula (such as a generated code, score, or price) so that it does not change when the submission is reopened.
This section lists all the formulae supported by Clappia. You can also refer to this sample Clappia app to see the formulae in action - https://marketplace.clappia.com/app/ALL624329
The examples below assume that the app already has fields with variable names number_one, number_two, number_three.
Addition:
- Using the '+' operator:
{number_one}+{number_two}+{number_three}
will not work if all arguments are not present.
- Using the SUM function:
SUM({number_one},{number_two},{number_three})
will work even if some arguments are not present.
Subtraction:
- Using the '-' operator:
{number_one} - {number_two} - {number_three}
will not work if some arguments are not present.
- Using the SUM function
SUM({number_one}, -{number_two}, -{number_three})
Multiplication:
- Using the '*' operator:
{number_one} * {number_two} * {number_three}
- Using the PRODUCT function:
PRODUCT({number_one}, {number_two}, {number_three})
Division:
- Using the '/' operator:
{number_one}/{number_two}
- Using the DIVIDE function:
DIVIDE({number_one},{number_two})
The examples below assume that the app already has a field with variable name number_one.
Round off number to 2 decimal places:
ROUND({number_one},2)
ROUND off a number to nearest 10:
ROUND({number_one},-1)
ROUND off a number to nearest 100:
ROUND({number_one},-2)
Round UP a number to its nearest 10:
ROUNDUP({number_one}, -1)
Round UP a number to its nearest 100:
ROUNDUP({number_one}, -2)
Round DOWN a number to its nearest 10:
ROUNDDOWN({number_one}, -1)
Round DOWN a number to its nearest 100: ROUNDDOWN({number_one}, -2)
Round off a number to its nearest multiple of 5:
MROUND({number_one},5) --
CEILING - Round UP a number to the nearest multiple of 10:
CEILING({number_one}, 10)
Works like MROUND but always rounds UP
FLOOR - Round DOWN a number to the nearest multiple of 10:
FLOOR({number_one},10)
Works like MROUND but always rounds DOWN.
CEILING.PRECISE (for negative numbers) - Round off a number to its nearest multiple of 3:
CEILINGPRECISE({number_one},2)
Works for negative numbers also, always rounds TOWARDS zero for negative numbers
CEILING.MATH (for negative numbers) - Round off a number to its nearest multiple of 3:
CEILINGMATH({number_one},3)
Works for negative numbers also. Rounds towards zero if 3rd argument is not passed.
CEILING.MATH (for negative numbers away from zero) - Round off a number to its nearest multiple of 3:
CEILINGMATH({number_one},3, 1)
Works for negative numbers also. Rounds away from zero.
TRUNC - Truncates the number to 2 decimal places without rounding off:
TRUNC({number_one}, 2)
INT - Integer part of a number by rounding down to the integer:
INT({number_one})
The examples below assume that the app already has fields with variable names string_one, string_two and string_thr.
Uppercase:
UPPER({string_one})
Lowercase:
LOWER({string_one})
String Concatenation:
- Using 'CONCATENATE' function:
CONCATENATE({string_one}, " ", {string_two}, " ", {string_thr})
- Using '&' operator:
{string_one} & " " & {string_two} & " " & {string_thr}
Using AND:
IF(AND({number_one}>5, {number_two}>5), "Numbers one {and} two both greater than 5", "One of the numbers one {and} two is {not} greater than 5")
Using OR:
IF(OR({string_one}="1", {string_two}="1"), "At least one of Strings one {or} two is equal to 1", "Both Strings one {and} two are {not} equal to 1")
Using NOT:
IF(NOT({number_one}=1), "Number one is not equal to 1", "Number one is equal to 1")
Using NE:
IF(NE({string_one},"1"), "String one is not equal to 1", "String one is equal to 1")
AND:
AND({number_one}=1, {number_two}=1)
OR:
OR({number_one}=1, {number_two}=1)
XOR:
XOR({number_one}=1,{number_two}=1)
BITAND:
BITAND({number_one},{number_two})
BITXOR:
BITXOR({number_one},{number_two})
BITOR:
BITOR({number_one},{number_two})
The examples below assume that the app already has Date fields with variable names date_one and date_two.
Current Date:
TODAY()
Creating a Date variable from Day, Month and Year variables:
DATE(1988,8,17)
Getting the Day part of a date:
DATE(1988,8,17)
Getting the Month part of a date:
MONTH({date_one})
Getting the Year part of a date:
YEAR({date_one})
Subtracting X days from a date:
{date_one}-7
Adding Y days to a date:
{date_one}+30
1st day of next month:
DATE(YEAR({date_one}), 1+MONTH({date_one}),1)
Diff of two date variables (in days):
{date_two}-{date_one}
Diff of two date variables (in months):
DATEDIF({date_two},{date_one},'m')
Diff of two date variables (in years):
DATEDIF({date_two},{date_one},'y')
End of Month:
EOMONTH({date_one})
X months before a date:
EDATE({date_one},-5)
Y months after a date:
EDATE({date_one},5)
Week Day:
WEEKDAY({date_one})
Week Number:
WEEKNUM({date_one})
The examples below assume that the app already has fields with variable names time_one and time_two.
Current Time:
NOW()
Show Time with Seconds:
TEXT(NOW(),"HH:mm:ss")
Displays time in hours, minutes, and seconds.
Note: Currently, displaying seconds will be supported only in the above formula.
Time in 12 hour Format
TEXT({time_one}, "hh:mm A")
Converts the time to show AM/PM.
Add X Hours to a Time variable:
{time_one}+8*60
Adding 8 hours* 60 minutes to a time variable.
Time Diff of two time variables:
({time_two}-{time_one})/60
The formula time_two - time_one gives output in minutes, hence dividing by 60.
Formatted time:
TEXT({time_one},"HH")
Convert a time variable with value 09:24 to 09.
PI
COS
SIN
TAN
COT
ACOS
ASIN
ATAN
ACOT
ACOSH
ASINH
ATANH
ACOTH
Absolute value of a number:
ABS({number_one})
Random number between 0 and 1:
RAND()
Random number in a range:
RANDBETWEEN(10,100)A

You can check this guide for the right formula or you can check online as we support similar spreadsheet formulas.
<iframe width=\"200\" height=\"100\" src=\"https://www.youtube.com/embed/Gw0I-KxNETo\" title=\"Clappia App Building ● Using Calculations & Logic Block ● No-Code Low-code Platform\" frameborder=\"0\" allow=\"accelerometer; autoplay; clipboard-write; encrypted-media; gyroscope; picture-in-picture; web-share\" allowfullscreen></iframe>
Normally, to add up values you can use the Formula block with the SUM function. However, in the case of Copyable Sections, you need to use the SIGMA function instead. Make sure to place this Formula block outside the Copyable Section, in another section.
For example: SIGMA({item_price}) will sum up all the item_price values across the copied section instances.

L374, 1st Floor, 5th Main Rd, Sector 6, HSR Layout, Bengaluru, Karnataka 560102, India

3500 S DuPont Hwy, Dover,
Kent 19901, Delaware, USA


3500 S DuPont Hwy, Dover,
Kent 19901, Delaware, USA
L374, 1st Floor, 5th Main Rd, Sector 6, HSR Layout, Bengaluru, Karnataka 560102, India
.svg)
